Scrivener- for Macs only.
First off I’m using version 1.08 (1.1 beta). So a few things may be different than the last non-beta release. But the Beta is really stable. If you have an older version of Scrivener though, make sure you back up your data files before you upgrade to the beta version. Once you convert your files to the beta version, don’t try and go back to the old version.
MAIN WRITING VIEW (for me)
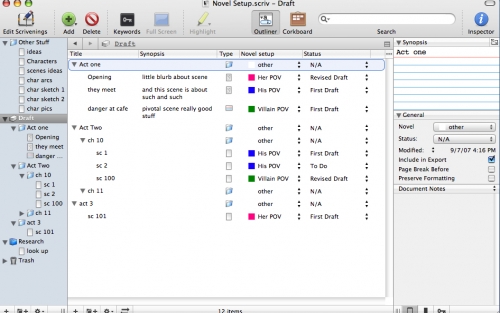
To see a larger version on the screen capture, click on the image.
In the binder, (the stuff to the left hand side) you can see that I set my files up like this:
STUFF (folder)
with the following files:
ideas
characters (notes, descriptions, names, secondary char etc.)
scene ideas (just one liners about scenes I want to write)
char arcs (char arcs for my main characters)
char sketch (the complete char sketch if I do one for a char)
char pics (I copy/paste pictures of my characters here)
you could add whatever you wanted here. Setting notes. GMC stuff. I find if I have these files set up, I can add things like hair color, eye color, last names, names of secondary characters, and see them at a glance by just clicking on a file.
DRAFT (folder)
Act one (folder)
sc 1 (file)
sc 2 (file)
sc 3…
sc 20
or alternatively you can break it into chapters
Act Two (folder)
Chapter 20 (folder)
scene 1 (file)
scene 2 (file)
scene 3 (file)
Chapter 21 (folder)
scene 1
Act Three (folder)
Writing by scenes, instead of chapters was a hard leap for me. But I like it now. You could always start out writing by scenes, then later as you revise, drag the scenes into chapter folders. I use the 3 Act folders because otherwise I had too hard of a time keeping up with all the scenes.
Research
Then under research I have a file for things I want to look up. You can also capture website info here, etc.
Okay, that was simple. You can drag scenes around and change their order as you go. You can put in one liner placeholders for scenes. I usually name my Acts, and name my scenes as I go along. Helps to remember what’s in the scene at a glance. The title of the scene will show up on the first line of the index card in corkboard view. (more about that view in a minute)
The above image is my basic view when I’m writing.
In the inspector panel: (right hand side)
SYNOPSIS
Change “Untitled” to the title of the scene on the first line of the card. This will show up on the first line of the index card in corkboard view. I type in a brief synopsis for the scene. This also shows up in the corkboard view. I sometimes list all the characters in the scene here too. Or the setting.
LABELS:
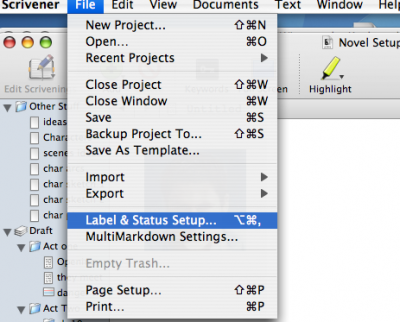
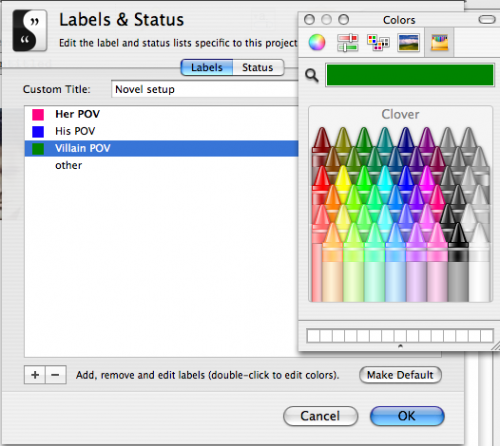
You can see how I have my labels set up. I put in a label for each character’s POV. (Click on file, label and status setup) Use the + and – at the bottom of the setup to add or delete labels.
I color code them. To color code them in the set up, just double click on the small box to the left of the label you set up and a box of crayons pops up. Pick your color. Using lighter colors than I did will make your cards easier to read.
Then when you add a new scene change the Label in the inspector to the correct POV for that scene.
I usually set up another status what is white in color, and use that for folders so the corkboard and outline don’t get too colorful.
Status:
I sometimes use the standard status. To do, first draft, revised draft, etc. But you could use this for anything you want. Things like suspense thread, romance thread, secondary thread. Or if you could use it for a timeline signifier. To set up your own, click on File, Labels and Status Setup.
Document notes:
I jot down anything I think of that I still need to do, or look up for this scene. You can also cut/paste a picture of your POV character here, or a picture of the setting.
Notice below document notes there is a key icon. If you click on this, you get the keywords space instead of the document notes. I often use my characters as keywords and list all the characters that are in this scene. (as opposed to putting them in the synopsis area. Not sure which I prefer)
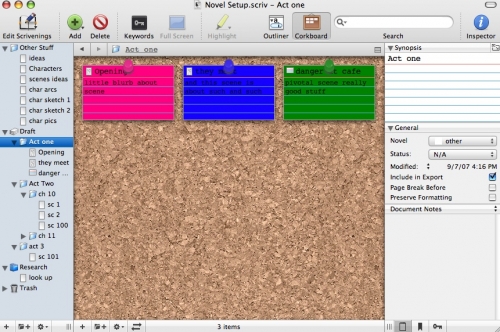
CORKBOARD VIEW
Click image to enlarge.
I have set the cards up to be tinted by the Label color. (Click on View, index cards, tint cards with label color). If that’s too much for you, you can still do the show pins, and they will be the color of your label.
OUTLINE VIEW
Here I’ve highlighted the draft and expanded all the folders. You can see the synopsis for the scenes, the label (POV), and the status.
Another cool Scrivener trick to cut down on distractions. Click on Full Screen on the top menu bar, and your background will darken out, and you’ll just have the blank page to type into. Hit escape to go back to the regular view.
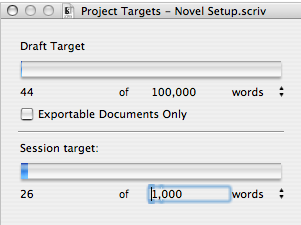
One more cool trick. Targets. Don’t know how I wrote without them. Set your target for the document. And set your session target. (to get to targets: Menu bar. Cick on view, statistics, show project targets. Or use the shortcut SHIFT COMMAND T) Here you can keep track of your total progress towards the completed novel and your progress on that writing sesssion. Love this feature.
For more help on Scrivener, there is a very active forum.
I’ve just barely scratched the surface of all the things Scrivener can do. But this is my basic setup for when I start a novel. Hope this helps.




I tried using writing software and I spent more time playing with it than actually writing. It looks like a great program.
It looks like a really fun program! I just downlaoded it so I could give it a whirl. 🙂
Rene’s comment reminded me of something else. This is not a how to writing program. It won’t help with plotting or ask you questions or anything like that. It’s simply (or complicatedly) a program that allows you to get those words down on paper and move them around.
I was just sitting down, visiting a few blogs while I try to figure out HOW I’m going to get this latest WIP ORGANIZED!:anyone:
Thank you for sensing my distress and posting this just in time! I’m off to check this out!:typing:
Except I don’t have a Mac!:wallbash:
Good catch Lory. I added that it’s only for Macs.
This program looks SO cool! If only I had a Mac…
I’m glad you’re back to blogging!!!:clap:
Excellent article on what seems to be a really terrific software tool. Wish I could find something like that for a Windows system . . . and then the skills to wrap my brain around it and leave all the sticky notes and scribble pads behind.
{ 1 trackback }